Three Little Pigs Soup

This wonderfully delicious, rich and smokey soup is just what you need on a cold winter day.

Delectable Chocolate Chip Cookies

Look no further - this is the only recipe you need for chocolate chip cookies!

Bella's Perfectly Chocolate Cupcake with Salted Caramel Buttercream

A cupcake that is the perfect marriage of double chocolate and salted caramel

Authentic Lebanese Hummus

Add a lighter fare to your big game day menu with this delicious appetizer

Flank Steak Vegetable Rolls with Balsamic Glaze

Easy weeknight dinner or perfect appetizer for a dinner party

30 December 2013

Carnitas Burrito Bowls with Salsa Fresca and Lime Cilantro Rice

I loooovvveeeee me some Chipotle! If I didn't feel like crap after eating it (basically because the portion sizes are so incredibly ridiculous), I would probably eat it on a weekly basis. But since that would result in a few less than desirable consequences (like having to buy larger pants), I'll refrain.

Not that my homemade version is significantly more healthy, it does taste a lot better. I love that I can control the fat by trimming the excess off of the pork and keep the sodium levels in check. Everything tastes fresh and I didn't have to get changed out of my comfy clothes to put dinner on the table! This is pretty easy to put together and it's awesome not having to stand in line. That's a win in my book!

Carnitas Burrito Bowls with Fresh Salsa


3 lb pork shoulder roast, remove excess fat
4-5 cloves of garlic, minced.
1/2 teaspoon dried oregano
1 T ground cumin
Sea salt and pepper, to taste
1 1/2 cups orange juice
1/4 cup lime juice

1) With a sharp knife, cut several slits into the pork roast and stuff the holes with garlic. Tightly wrap with Seran Wrap and put in the refrigerator overnight.

2) In the morning, pull out the pork. Combine the remaining ingredients in the crock pot and stir.

3) Heat a large frying pan on high heat and sear the pork shoulder on each side. Once its seared, place it in the crock pot and cook on low for 8 hours. 

4) After 8 hours, remove the pork from the crock pot and using two forks shred the pork. Reserve one cup of the juices, drain the rest. Place the shredded pork back into the crock pot with the reserved juices and allow to cook for another 20 minutes, to soak up the juices.


In the meantime, prepare your fresh salsa so that flavors marry well.
 

Salsa Fresca

1 large beef steak tomato, chopped in small pieces
1/4 cup red onion, finely chopped
1/4 cup cilantro, roughly chopped
1/2 jalapeno, finely chopped
Sea Salt
Lime juice

1) Combine all measured ingredients into a bowl.
2) Add in a few cranks of sea salt from a grinder and lime juice (I usually don't measure this, but its probably the juice of a half to full lime)

 
Next .... make the Lime Cilantro Rice 
 

Lime Cilantro Rice

Jasmine Rice, prepared as directed (mine called for 1 cup of rice)
1 handful of cilantro, finely chopped
Juice of 1/2 lime
Sea Salt

1) Prepare rice as directed.
2) Once rice is done cooking, fluff with a fork.
3) Add in cilantro, lime and salt to the rice and stir.


Now its time to build your most amazing burrito bowl ever. Start with a good helping of rice, topped with a good portion of pork, then add some cut up lettuce, cheese, sour cream and top with a good spoon or two of the fresca salsa.


You're welcome!!


29 December 2013

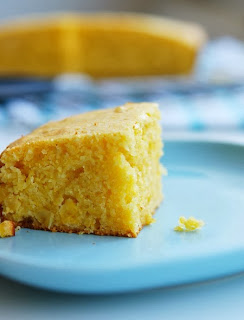
Buttermilk Cornbread

This cornbread is a great compliment to any meal. This  recipe is a bit sweet but not overly sweet. Just a nice hint of sweetness amongst the other wonderful flavors.


Buttermilk Cornbread


(photo courtesy of this blog)
1 stick unsalted butter
2/3 cups white sugar (can use 1/3 c brown sugar in place of white)
2 eggs
1 cup buttermilk
1/2 teaspoon baking soda
1 cup cornmeal
1 cup all purpose flour
1/2 teaspoon sea salt


1) Preheat oven to 350 degrees. Spray a 9 inch pan with non stick cooking spray. Set aside.
2) Melt butter and pour into mixer bowl. Add in sugar and eggs quickly and mix until combined.
3) Measure out buttermilk and add baking soda to it and add into the egg mixture.
4) Add in remaining ingredients and pour into prepared pan and cook for 35-40 minutes, or until done.
5) After pulling it out of the oven, immediately drizzle honey over the bread and melt a small amount of butter over the top also.

Three Little Pigs Soup

As the name suggests, this soup has three types of pork in it. Of course, you can eliminate one or two of them but I think you'd loose some of the depth this soup has. Its everything a soup should be: hearty, earthy, thick, and bursting with layers of flavor.

I had my sister and her main squeeze over for dinner and they agreed by helping themselves to seconds. This was a great way to use up the leftover christmas ham (check the blog because that recipe was FANTASTIC and blows the national ham chain out of the water) and get in some fiber and warm up on a cold Ohio December day.

I served this with a very delicious homemade cornbread (recipe on the blog also). This particular cornbread is a bit sweet (but not overly sweet) to balance the smokiness of the soup.

You're welcome in advance!


Three Little Piggies Soup


6 slices of bacon, coursely chopped
3 links of mild italian sausage, cut into bite size pieces (casing removed)
Ham, chopped into small pieces (I used leftover, equivalent of about 4-6 spiral slices)
1 small white onion, diced
3 cloves garlic, chopped
2 cans black beans, drained and rinsed
1 can garbanzo beans, drained and rinsed
1 28oz can fire roasted diced tomatoes
2 cans chicken broth (the normal size cans) I always use low sodium/low fat
1 chipotle pepper (with adobe sauce), chopped small
2 teaspoons cumin
3/4 teaspoons dried oregano
few dashes of smoked paprika
dash of dried minced onion
salt and pepper to taste

1) In a frying pan, cook the chopped bacon until it is crispy. Remove from the pan and put on a paper towel lined plate to remove excess grease. Reserve 1 tablespoon of the grease, discard the rest. 

2) In the reserved grease, add onion, garlic and italian sausage and cook until the sausage is done and the onions are not burnt.

3) Combine all the other ingredients into a stock pot and bring to a boil. Add in sausage/onion mixture and bacon.

4) Allow to boil for a short period of time, then reduce heat to medium low and allow soup to cook for 3-4 hours. Stir occasionally and adjust flavors as you see fit. I liked the smokiness that the adobe paste brought to the soup so I added a bit more while it was cooking. If you like less heat, remove the seeds from the pepper before adding it to the pot.

13 August 2013

Roasted Vegetable Enchilada Lasagna

I'm sure in previous posts, I have declared my love for all types of Mexican food. The flavors, the colors, THE AROMAS...All of it just makes my stomach rejoice!!

..... I digress ....

In my attempt to feed my family healthy meals that don't lack the deliciousness we deserve and trying to loose a few pounds myself, I am always on the lookout to be inspired. Mexican food isn't typically waist-line friendly but there are definitely ways to lighten them up without sacrificing the flavors.

In this dish, the real star is the roasted vegetables. There really is not a lot of added flavorings to this dish. Do not let the simplicity of this recipe and the ingredient list turn you off or make you think you will have a flavorless dish. It is quite the opposite, my friends!

I hope you enjoy! As always, I welcome the feedback and why you're at it...why not PIN it to your favorite board!


Roasted Vegetable Enchilada Lasagna


1 poblano chile, cut into thin sticks
2 red bell peppers, cut into thin sticks
1/2 head of cauliflower broken into small/medium sized pieces
1 small white/yellow onion, shaved or sliced thin
1 c. frozen corn
1/3 zucchini, sliced 1/4 inch thick then into thin sticks
2 chicken breasts, cooked and shredded
baby spinach leaves (a few hand fulls)
2 T ground cumin
2 cloves of garlic, minced
salt and pepper, to taste
2 cups salsa
1/2 cup cilantro, chopped
9-10 flour or corn tortilla's, cut in half
2 c. shredded cheddar or mexican blend cheese
light sour cream and green onions, for garnish


1) Preheat your oven to 425 degrees. 

2) Place poblano chile, bell peppers, cauliflower, corn, onion and zucchini into a bowl and drizzle with olive oil. Toss to coat all vegetables (but you dont want to have a pool of oil at the bottom). Sprinkle with cumin, garlic and salt and pepper and toss again.

3) Place vegetables in a roasting pan (or any other deep dish) and roast for about 40 minutes, or until you start to see the vegetables get a gorgeous roasted look. You'll want to stir them every 15 minutes or so to roast evenly. Remove and reduce oven temperate to 350 degrees.

4) Spray a casserole dish with non-stick cooking spray. In a small bowl combine the salsa and cilantro. Spoon 1/4 of the mixture on the bottom of your pan. Lay down a layer of tortillas, then 1/3 of the roasted vegetable mix, 1/3  shredded chicken, handful of spinach and 1/3 shredded chicken. Repeat each layer and you should end with cheese on the top. 

5) Top your lasagna with the enchilada sauce (use as much or as little as you'd like)

6) Cover with foil and bake for 20 minutes. Remove the foil and bake for an additional 10 minutes to get a nice color on the top of your lasagna. Let stand and cut into servings. Top each with a dollop of sour cream and a sprinkle of green onions. 


recipe inspired by this blog

Zucchini and Rice Skillet

Way back when I first stumbled upon the Pinterest world, I pinned a recipe that sparked some interest to me. Funny how when I look through all of my pins, how many of the food items I have yet to try.

This past week, I decided that I was going to add this into the mix. I changed up the originally recipe a bit because I was afraid that the original was going to lack a little flavor and would leave the stomach still wanting more. 

Our little family really enjoyed this dish. I especially liked that it was a one pot meal which meant less dishes for me!! It's really a win-win. I hope you enjoy it. I'd love to hear your feedback.

Zucchini, Beans and Beef Skillet

photo courtesy of this blog

1/2 pound beef
1 1/2 c. sliced zucchini, washed and cut in quarters
1/2 c. green bell pepper
1/2 c. red bell pepper
1/2 small onion, chopped
2 cloves garlic, minced
1-15 oz can black beans, drained and rinsed
1 - 14.5 oz can fire roasted tomatoes, diced (I used the kind seasoned with garlic) UNDRAINED
3/4 c. water
1 c . instant brown rice, uncooked
1/2 c. shredded cheddar cheese

1) In a skillet on medium-high heat, dropped your ground beef into medium sized chunks and cook until cooked through.
2) Drain most of the grease (reserving 1-2 T of drippings in the pan) and add in onions, bell peppers, zucchini and garlic. Cook until veggies are a bit soft (just about 5 minutes).
3) Add beans, undrained tomatoes and water and turn heat on high and bring to a boil.
4) Add in uncooked rice. Stir well.
5) Cover and remove from heat and let stand for about 9 minutes or until liquid is absorbed.
6) Garnish with cheddar cheese and serve. 


this recipe was adapted from this blog

03 July 2013

Snickerdoodle Cupcake

I really like Snickerdoodle cookies. I've never really been a chocolate lover but I do love pumpkin and cinnamon. There's just something about a warm snickdoodle with a tall glass of milk (add ice please).

I came across some recipes on Pinterest for different cinnamon flavored cupcakes and thought that re-creating a snickerdoodle cookie could be very fun! I wanted to not only get the right cinnamon taste but I wanted the cinnamon coating crunch and the dense-foamy-ness that a true snickerdoodle possess.


I think the key to this cupcake turning out so delicious is using REAL cinnamon. I've done some research and the cinnamon that we can buy for $1 at save-a-lot is not real cinnamon. Its basically cinnamon flavored chalk dust. I bought THIS CINNAMON off of Amazon and have not been let down. A little goes a long way, I promise. And the taste is like nothing you've had before. 

I am really happy with the way that this cupcake turned out! I have made it about half a dozen times and each time people moan upon each bite and give rave compliments. I'm so happy that other people enjoy it as much as I do.


Snickerdoodle Cupcake with CinnaButtercream Frosting


Cake Ingredients:

1 1/2 c. all purpose flour
1 tsp baking powder
1/4 tsp. salt
1 tsp cinnamon (I highly suggest a Grade A cinnamon)
1/2 c. melted butter, cooled
1 1/4 c. white granulated sugar
2 large eggs
1 1/2 tsp. pure vanilla extract
1/4 tsp. almond extract
3/4 c. whole milk or buttermilk
cinnamon/sugar mix

1) Preheat your oven to 350 F and line cupcake tin with liners.
2) Sift together flour, baking powder, salt and cinnamon in a bowl and set aside.
3) In a mixing bowl, beat together sugar and butter until it is fluffy and light in color. 
4) Add in eggs, one at a time, followed by vanilla and almond extracts and milk. Mix until smooth.
5) Slowly add in the dry ingredients and mix until smooth.
6) Spoon into cupcake liners (I use an ice cream scoop for consistency). Fill 2/3 full. Before putting in the oven generously sprinkle cinnamon/sugar on the top of each cupcake then bake for 15-18 minutes, or until toothpick comes out with sticky crumbs on it.


Frosting Ingredients:
1 stick unsalted butter, softened
3 c. powdered sugar
1/2 tsp. vanilla extract
1 T cinnamon
3 T whole milk

1) Beat butter until light in color and fluffy.
2) Slowly add in powdered sugar (I always start with 2 cups then add in) and beat for 3-4 minutes.
3) Add in vanilla and cinnamon and milk to loosen, if necessary.

Pipe onto cooled cupcakes, garnish with just a pinch more of the cinnamon/sugar mix and ENJOY!!


Raspberry Buttercream Frosting

I owe all the credit in the world to This Blog for this recipe. I have never added any liquid fruit to a frosting before but now's as good a time as any, right?!

I paired this with a lemon cake and it was REALLY good.

I did tweak her original recipe just a bit and am definitely keeping this recipe in my back pocket.

Raspberry Buttercream Frosting


1/2 c. unsalted butter
12 oz bag of frozen raspberries (you can use fresh also)
1/2 c plus 2 T fresh squeezed lemon juice
Lemon Zest
1/2 tsp. vanilla extract
3 - 4 c. powdered sugar
pinch of salt
1 to 2 T. whole milk or cream, as needed

To make a raspberry sauce: In a saucepan over medium heat, cook the raspberries until they are broken down and turn into liquid (for the most part). Line a mesh strainer with cheesecloth  and place in a smaller saucepan. Pour the cooked raspberries into the cheesecloth and allow it to strain into the smaller pan. I used a plastic spoon and squished the raspberries to remove all the juices I could. Place back on to burner, add just a bit of lemon zest and cook until the sauce reduces. It will become a rich red color. Remove from heat and cool completely.

Affix the paddle attachment to your mixer and cream the butter until it is light colored and fluffy. Add in powdered sugar (I start with about 2 cups), 2/3 cups of the raspberry sauce, lemon juice, vanilla and salt and mix until it is really smooth. Add in additional powdered sugar to firm it up. You can add in milk/cream if you like a thinner consistency.

This buttercream was the perfect compliment to a lemon cake (I did not use her recipe for the lemon cake) but would also be quite delightful on a chocolate cake or maybe use the sauce as a base to create a filling!!! It is also good just off the spoon.....


27 June 2013

Choco-stachio Cupcakes with Rich Chocolate Buttercream Frosting

I stumbled upon a recipe sort of like this one on a blog that I occasionally visit for kicks. It's a pretty good blog but if I had to pick one thing that irkes me about it is that most of the recipes use boxed cake mix. And while that is okay (and sometimes necessary) I have taken to making my cupcakes from scratch. The one mix I don't mind using when I bake is Devil's Food. Not sure why I don't have an issue with this one but have trouble caving to the pressure of using others, but oh well. Not really too concerned.

So I found this recipe and thought "that's interesting". I've never had a pistachio prior to making this cupcake. In fact, my only known run in with pistachio's had been tasting a bite of a pistachio cheesecake when my sister, mom and I went out to lunch for Mother's Day. I was delighted with the smooth and slightly nutty taste of them. So when I saw this recipe I had a good feeling that the pistachio would be a nice compliment to a chocolate cake. Off to the store I went.....
(If I can offer a bit of advice, spend the extra dollar or two and go for the pistachio's that have been shelled. Trust me on this one)

Choco-stachio Cupcake with Chocolate Buttercream


Cake Ingredients:
1 box Devil's Food Mix
1 - 3.4 oz box of pistachio pudding mix
4 large eggs
1/3 C. oil
3/4 C. buttermilk
1/2 C. sour cream (I exclusively use Daisy Light)
1 tsp. almond extract
1/4 tsp. vanilla extract
1/4 C. semi sweek chocolate chips
1-2 handfuls of finely crushed pistachio's

1) Set your oven at 350 Degrees F.
2) Combine cake mix and pudding mix in a bowl and set aside.
3) In mixer bowl, combine eggs, oil, buttermilk, sour cream and almond and vanilla extracts and combine until well incorporated.
4) Slowly add in the cake/pudding mix and mix until all the lumps are gone.
5) Fold in the chocolate chips and crushed pistachio's.
6) Pour into lined cupcakes (fill 2/3 full) and bake for 15-21 minutes or until an inserted toothpick comes out with moist crumbles (not liquid)

Frosting Ingredients:
1/2 C. unsalted butter, room temp
1/2 C. salter butter, room temp
3/4 C. Ghiradelli cocoa powder, sifted
2 tsp. vanilla extract
1 T. heavy cream or whole milk
2 second quirt of Hershey's Chocolate Syrup (yes that's a measurement in my book lol)
3-4 C. powdered sugar

1) Beat butter in a mixing bowl for 2-3 minutes. You want the butter to be a pale color and have a visible whipped look to it.
2) Add in cocoa powder, vanilla extract, cream and chocolate syrup (really, just squeeze the bottle and count to two)
3) Slowly add in the powdered sugar until you've reached the desired consistency.

Once the cupcakes have cooled completely, pipe the frosting on top and garnish with crushed pistachio's.

(I used the Wilton large open star tip for this frosting)

26 June 2013

Cookie's N Cream Cupcakes

Wow...it's been a while since I posted and for that I apologize. I've been pretty busy with customer orders for invitations AND cupcakes (YAY!!), work and just enjoying life!! We've seen some pretty nice weather here in Ohio (although, I'd be interested in looking up how much rain we have had in the last few weeks and see if it broken records) so we've been trying to enjoy it while it's here. Bella has really taken a liking to going on walks after dinner.

Speaking of Bella....she has also taken quite the liking to helping me in the kitchen. I always plop her up on the counter while I'm cooking or baking and she always wants to help. I hope that these are memories that stick with her forever, but in the meantime I'm enjoying her wanting to share this time with me in the kitchen.

I have an order coming up that I am doing for a Military Women Appreciation Banquet. I met this lady through a local swap group on Facebook and I have become quite fond of her. She has the cutest little 7 month old son, three adorable dogs and has a big heart. I first met her when I bought some supplies off of her to create a diaper-cycle for my boss and his wife's baby shower here at work and since then I just adore her. Anyway, she is a career counselor for the Army and she came up with this idea to throw the women in her squad and wives of the men in her squad an appreciation banquet. She wasn't sure how it would go but its coming up this Saturday and I already know its going to be a WONDERFUL event. She's had so many companies and individuals donate items to thank these ladies for their sacrifices and has been so overwhelmed with the generosity. Anyway, she asked if I would donate a diaper-cycle for a raffle since a few of them women who will be attending are expecting babies and I happily accepted. I was talking to her about what her thoughts were on the dessert for this banquet and after a few conversations, we decided on a pretty nice dessert spread that will include a few cupcake flavors and some a few different varieties of cookies. I'm grateful to be a part of this event and am so excited to hear all about it once it's over!!

I pinned a Cookies N Cream cupcake recipe a while back and it's been begging for some attention. I guess the reason I hadn't made it yet is because we don't typically have Oreo's in our house. Certainly not because I don't like them. In fact, its the polar opposite. We LOVE Oreo's. Between Shawn and I, we could polish off two bags of them with no problem or remorse. Well...until the next day when we take off the comfy pants and try to slip into a pair of fitted pants lol. So we don't keep them in the house for that reason.

Well yesterday seemed like the perfect opportunity to make these.  My mom invited us over for dinner (swiss steak and mashed potatoes!) and it was someone's birthday at work and I had been toying around with this recipe for the Military Appreciation Banquet. Since I had three reasons to buy Oreo's, I took it as a sign from a higher power. And when the higher power says buy Oreo's, we listen.

While this recipe is pretty solid, I think I will experiment with a few changes next time. I'll let you know how those turn out. In the meantime, go pick up two packs of double stuffed Oreo's and make this recipe. Why two? Well, one for the recipe, one to sit down with a gallon of milk to enjoy while they are baking. Why else would you need the extra pack? LOL.

Cookie's N Cream Cupcakes


Cake Ingredients (yields about 30 cupcakes)
3/4 C. Ghiradelli unsweetened cocoa, sifted
1 C. hot water
1 C. buttermilk
2 C. sugar
2 large eggs
1/2 C. vegetable oil

1 1/2 tsp. pure vanilla extract
2 C. all purpose flour
2 tsp. baking powder
1 tsp. baking soda
1/2 tsp. salt
1/2 C. heavy cream
14 Double Stuffed Oreo's, finely crushed

1) Add cocoa powder to the mixer bowl and add in the HOT water. Whisk until the cocoa is dissolved.

2)  Slowly add in the buttermilk to cool down the mixture then add in sugar and mix until combined.
3) Add in eggs, oil and vanilla. And mix.
4) In a bowl, add all dry ingredients (not the cookies). Slowly add into the wet mixture until all ingredients are well incorporated.
5) Stir in heavy cream until evenly mixed.
6) Gently fold in the crushed Oreo's.

(do not freak out if the mix seems watery before you add the cream. It will, but the whipping cream helps to thicken it up. If you're a little worried you can add a small amount of additional flour but it is not necessary I promise)


Pour cupcakes into lined cupcake tins and bake in a 350 degree F oven for 15-19 minutes. Let cool and chill in the fridge for 30 minutes.


While your cupcakes are baking you can move on to the frosting.

Frosting Ingredients (will be enough to frost about 24 cupcakes generously or all 30 modestly)


1 (8 ounce) package light cream cheese, softened
2 T. Butter, softened
1/2 tsp. salt
1 envelope of Dream Whip
1 tsp. pure vanilla extract
3 C. powdered sugar
6 Double Stuffed Oreo's- separate cream and cookie

1)  Beat softened cream cheese and butter until smooth and creamy. 
2) Put the cream filling from the Oreo's into the bowl and continue to mix.
3) Add vanilla and salt and beat for a few minutes. 
4) Add in dream whip dry packet (not prepared) and mix well.
5) Add in sugar until desired consistency is met.
6) Lastly, crush the cookie very finely and add into the bowl and fold in until just combined.
Once the cupcakes have chilled, pipe the frosting onto the cupcakes and shove one in your mouth!!!

Enjoy!


09 May 2013

Lemon Poppyseed Surprise Center Cupcakes with Blueberry Cream Cheese Frosting

I wish that I could take credit for this recipe but I can't.  I pinned this recipe a few weeks ago while I was on a mission to find a few spring/summer inspired cupcake recipes. I then got an order for a Military Women's Gala and thought this would be a wonderful flavor combination. I would say the hardest part about these cupcakes was finding the freeze dried blueberries. I literally called 17 stores in my area and no one had them. I just happened to remember of a high-end market that concentrates on organic and healthy food option. So I took a slight detour on my way home and voila!!! They had them!!!! They can be found online but I didn't want to pay for shipping if I didn't have to. Once I had all the ingredients, I decided to whip up a batch of these to see if they were as delicious as the original authors photos were.

This recipe does not disappoint in the least. All of the flavors work wonderfully together and are an explosion of spring and summer on your taste buds. The tangy lemon dances on your tongue and the blueberry frosting provides a nice sublte lady like curtsy to round it off.  Anyway, I didn't make any alterations to the recipe to so I'll re-type the recipe as is but all the credit goes to Eva.

The only thing I will change is how it is presented. Her recipe was a lot of back and forth the way it was written but it didn't effect the cupcake, just the ease of use. So here it is!! You should definitely try these! They are worth the effort in finding the freeze dried blueberries.

Lemon Poppyseed Surprise Center Cupcakes with Blueberry Cream Cheese Frosting


Cake1 Stick of butter, softened
1 1/4 c. granulated sugar
2 Eggs
3 T fresh grated lemon zest
1/3 c. plus 2 Tablespoons fresh lemon juice
1/3 c. Daisy light sour cream
2 T. milk
1/2 tsp pure vanilla extract
1 1/2 c. all purpose flours
1/2 tsp. salt
1/4 tsp baking soda
1/4 tsp baking powder
1 T poppy seeds

1) Preheat oven to 350 Degrees Farenheit. Line cupcake pan with liners. (Eva says that this makes 12 standard cupcakes but i got 13 standard and 9 mini)
2) In a large bowl, cream together butter and sugar then add the eggs, one at a time, mixin well between each.
3) Add grated lemon zest.
4) In a small bowl, combine ingredients in green above and set aside.
5) In a medium bowl, combine the ingredients in blue above and set aside.
6) Once you've added the lemon zest to the sugar/butter mixture, slowly alternate adding the flour mixture and the lemon juice mixture to the mixing bowl. Start and end with the dry flour mixture. Once combined, stir in the poppy seeds.
7) I filled cupcake liners 2/3 full and baked for about 25 minutes (your oven may vary so check on them after 18 minutes to make sure you don't overcook them.


While the cupcakes are baking, you can make the lemon curd!

Lemon Curd
1 egg
1 egg yolk
1/4 c. plus 2T  granulated sugar
3 T fresh squeezed lemon juice
1 T butter, melted
1 1/2 tsp. grated lemon zest

1) Whisk together all ingredients in the top of a double boiler. Make sure the water does not touch the bottom of the top pan in the double boiler.
2) Allow the lemon curd to cook for 15 minutes, stirring every 3 minutes until it thickens.
3) Remove from heat, transfer to a small bowl and let cool to room temperature.


Blueberry Cream Cheese Frosting
4 oz cream cheese, softened
1/2 c. butter, room temperature
1.2 oz package of freeze dried blueberries
1 c. powdered sugar

1) Pour freeze dried blueberries into a blender. Blend until they turn into a fine powder (Eva used a magic bullet)
2) Cream together the butter and cream cheese until smooth
3) Add in the powdered sugar and powdered blueberry (you may add more powdered sugar 1 tablespoon at a time to reach desired consistency).


Once the cupcakes and lemon curd are cooled, scoop a small amount of cupcake out of the center of each cake and fill the holes with the lemon curd. Then, fit a frosting bag with desired tip (she used 9mm star) and fill the bag with the frosting. Pipe frosting and top with a sprinkle of poppy seed on each cupcake.


Just look at these photos!!! Again, all gorgeous photos from the original poster, Eva


21 March 2013

Reese's Inspired Cupcake Heaven


Chocolate Cupcakes with Chocolate Peanut Butter Filling and Peanut Butter Frosting


1 Box Devils Food Cake Mix
1 c. sour cream
1 /2 c. oil
2 tsp. vanilla extract
3 eggs
1 /4 c. water
1 /2 c. buttermilk

Filling:
1 /2  bag semi sweet chocolate chips
2 T heavy cream
1/3 peanut butter (more or less to taste)
2-4 T powdered sugar (use to control consistency)

Frosting:
1 /2  c. butter, room temperature
1 c. peanut butter, creamy
2-3 c. powdered sugar (add in a little at a time)
Milk or cream (add a bit at a time to reach desired consistency)

1)    Preheat oven to 350*. Line cupcake tin with liners; set aside
2)    In a bowl, mix together sour cream, oil and vanilla. Add eggs one at a time, mix thoroughly.
3)    In a small bowl, combine buttermilk and water. Alternating between the cake mix and the liquid, add to mixing bowl with egg mixture. (start and end with adding the cake)
4)   Fill liners 2/3 full and bake for 14-16 minutes, or until done.
5)    To make the filling: add chocolate chips, peanut butter and cream to a double boiler and stir to avoid burning. Keep stirring until the chocolate is silky. Add in powdered sugar to turn it into a consistency similar to ranch dressing. Not too runny but not too thick.
6)    Pour into a squeeze bottle or allow to cool a bit and put into a piping bag.
7)    When cupcakes are done, pull them out of the oven. Insert the end of the squeeze bottle or piping bag with small tip on it into the center of the cupcake and squeeze a filling into each. I usually count to two seconds.
8)    For the frosting, cream together butter and peanut butter until combined. Slowly add powdered sugar and add milk/cream until desired consistency is achieved.
Pipe onto cupcake and garnish with chopped reese cup’s and drizzle with chocolate/peanut butter filing!

19 March 2013

Drunken Italian Confetti Noodles

Wow...I feel like I haven't posted anything for quite some time. I almost feel like I have abandoned the blog. It's been a pretty busy past couple of weeks, so I do apologize for the silence.

Two weeks ago, my local grocery store had their super meat sale that they do twice a year. Our tax return came in and we decided to buy a chest freezer and load up on meat products we eat on a regular basis to take advantage of the deep discounts. We stocked our new freezer with chicken, beef, sausage, frozen vegetables and much more!!! So excited!! (Does that age me? lol)

I stumbled across some inspiration on Pinterest for this recipe. I tweaked it to make it my own but didn't drift too far away from the original. I can't tell you how many times I've attempted to jazz up some noodles by adding vegetables or something else that sounded good and it just fell flat of the promise I thought the dish had. I was a little nervous that this recipe would do that too but there's not a recipe on my epic fail list that included wine. So I thought it was worth a shot. And I am so glad that I tried it because this dish was nothing short of delicious!! It was pretty easy to make, all the ingredients are something you should have on hand, and it didn't take all that long to come together! I encourage you to give it a whirl. On the site that I pulled the original recipe off of, the blogger said "Out with the “eh”, the “OK” and the “so-so”, and in with the “WOW!” and the vibrancy that is all around." This recipe embodies this quote!!


Drunken Italian Confetti Noodles

4 spicy italian sausage links, casings removed
1/2 medium sized white onion, sliced thinly
1 small red bell pepper, sliced thinly
1 small yellow bell pepper, sliced thinly
1 small orange bell pepper, sliced thinly
5 cloves garlic, minced
1/2 cup white wine (chardonnay)
1-28 oz can chopped tomatoes with juice (diced is fine too)
3-4 T flat leaf parsley, chopped
1/4 C fresh basil, confetti
8 oz Pappardelle noodles (or any other thick ribbon style noodle)
Olive Oil
Salt and Pepper
1 tsp. onion powder
3 tsp. dried oregano
1) Heat skillet on medium-high heat. Add sausage to pan and brown it. I like to leave mine in small to medium sized chunks, but this is a preference thing. Remove from the pan and let rest in a covered bowel.In the meantime, cook noodles according to package to al dente.
2) Reserve some drippings and return to heat. Add onion and cook for about 5-7 minutes. You want them to sautee and really start to become transparent.
3) Add salt, pepper and oregano to the onions. Add in the peppers and continue to cook for an additional 3-4 minutes.
4) Add in garlic and sautee for 3-4 minutes. Once it becomes aromatic, add in white wine to the pan. Allow to burn off, then add tomatoes to the pan. Add parsley and half the basil to the sauce.
5) Add sausage back to the pan to finish the cooking process. Cook for 4-6 minutes to blend all the flavors. Add a nice drizzle of olive oil to finish it off.
6) Drain your noodles once they are done cooking and return them to the large pot and reduce heat to medium.
7) When your sauce is done, pour it on top of the noodles in the large pot, gently toss with a pair of tongs.
8) To serve, garnish with a sprinkle of fresh basil.


27 February 2013

3 Cheese Tortellini Alfredo with Sun Dried Tomatoes, Asparagus, and Roasted Red Peppers

Wow, that's a mouthful. But please don't let the title deter you from trying this incredibly easy, quick and delicious recipe.

I'm not feeling particularly 'wordy' today but I had several people comment on my facebook post asking for this recipe. I'll get right to the point so that I please their hungry tummy's!


3 Cheese Tortellini Alfredo with Sun Dried Tomatoes, Asparagus,
and Roasted Red Peppers


2 Medium Chicken Breasts
1 Large Red Bell Pepper, thick sliced
1 Bag Frozen 3 Cheese Tortellini (I bag I used served 5)
1 Jar Alfredo Sauce (Or your favorite recipe for one)
1/4 C. 2% milk
2 Cloves Garlic, minced
1/2 bunch Asparagus, chopped in 1 inch pieces
1/4 C. Part Skim Mozzarella Cheese, Shredded
Salt
Pepper
Garlic Herb Seasoning

1) Heat oven to 450 Degrees. Also bring a large pot of salted water to a boil.

2)  Place sliced red bell peppers in a glass dish. Drizzle a little olive oil over the peppers and toss. Sprinkle some sea salt on the peppers and place in the oven. Roasting will be complete in about 15 minutes.

3) Once water is boiling, cook tortellini according to directions. Drain when done, drizzle with olive oil and sprinkle with garlic powder (just a bit).

4) In the meantime, place chicken breasts in a skillet over medium heat. Season both sides with garlic herb seasoning and cook until chicken is almost cooked. Remove from pan and set aside. After the chicken has rested for about 10 minutes, slice against the grain into slices (about an inch thick)

5) In the skillet you cooked the chicken in, add the alfredo sauce, milk and garlic cloves. Allow to come to a slight boil then reduce heat to a simmer and cook for about 8-9 minutes. Add in sliced chicken and asparagus and turn heat onto medium to bring to a low boil again. Keep stirring and allow it to boil slowly to finish cooking the chicken breasts and asparagus, about 3 minutes.

6) When red peppers are done roasting, place on a cutting board and cut into big chunks. Add to the alfredo sauce. Add mozzarella cheese to the sauce, give a good stir and cook for 1-2 minutes.

7) To serve, put tortellini on a plate or in a bowl and top with a good helping of the sauce.

*I had this for leftovers at lunch today and it was DELICIOUS! Would be a good sauce to add red pepper flakes to to add a little bit of heat*


25 February 2013

Lightened Up Chicken Pot Pie Soup

I live in Ohio. And its Winter. Enough said?! LOL!

Without fail, every year when winter hits, I end up telling myself and those within ear shot that I "can't wait to get out of here". Yet each year, I find myself still here, suffering through the dreary winter days. Aside from it being cold and having the occasional blizzard, the drearyness is the worst part of it. Today broke a 14 day stretch of having no sun. YUCK.

I wanted to make something like a chicken pot pie but Shawn is on his yearly lenten diet and I don't tend to lean towards heavy, calorie-laden dinners (unless it involves hot sauce and fried chicken). And I didn't feel like devoting a large chunk of my time in the kitchen this weekend.

I ended up landing on the idea of making a soup inspired by the flavors and goodness of chicken pot pie but without all of the unwanted heavy ingredients and time.

You can make substitutions on the vegetables to fit your family's tastes. I'd love to hear what you think about this!!


Lightened Up Chicken Pot Pie Soup


(photo courtesy of  www.noblepig.com)
1/3  C. flour
3 C. Chicken Stock
5 C. 2% milk
1/2 medium sized onion, chopped
2 stalks celery, sliced
2 medium carrots, sliced and quartered
2 cloves garlic, chopped
1/2 bag frozen green bean
1 bag frozen corn
2 Chicken Bouillon Cubes
Ground Black Pepper
Sea Salt, to taste
2 tsp. Herbs De Provence
2 medium to large sized chicken breasts, cooked and chopped into bite size pieces
2 medium to large sized potatoes, cut in small cubes

1) In a bowl, combine 1 cup chicken stock with the flour and whisk until the flour is incorporate. Set Aside.
2) Pour remaining chicken stock and milk into your soup pot. Slowly bring to a boil.
3) Add onion, celery, carrots, garlic, frozen vegetables, chicken buillons, herbs and salt and pepper and bring to a boil. 
4) Partially cover and reduce to simmer on low to medium low until vegetables are tender. 
5) Add potatoes and chicken and simmer on a low boil until potatoes are cooked through and tender. 
6) Slowly whisk in the stock/flour mixture that you set aside in step 1. You may need to add more depending on how thick you like your soup. 
7) Make sure to adjust seasonings to taste prior to serving.


11 February 2013

Authentic Lebanese Hummus

When it comes to food, I am big on texture. If it doesn't feel right, I have a hard time eating something. This hurdle obviously prevented me from seeing why people would crave sushi. It also had the same impact on my ability to enjoy hummus. I remember the first time I had both of these foods. I would pay to go back in time and see my face. I think it goes without saying that I was not impressed. At all. And had no desire for a 'second chance'.

It took some heavy persuasion from people that I love to try sushi and hummus again but I gave each of them a second chance. And loved them both! I guess it just takes a little time, a little recommendation, and the right chef behind them.

One of my favorite restaurants is Aladdin's Eatery. It's a local chain (I think they have 5-6 locations) that is run by a Lebanese family and really have opened my eyes to their delicious cuisine. My sister and I had taken my mom there for mother's day 4 years ago. They both go crazy for their hummus and insisted I give it a try. I wanted to make my mom and sister happy so I tried it. And I was hooked. It was a velvety smooth texture that had this wonderfully fresh taste. It was night and day from the store bought, processed hummus. In a pinch, I will buy Sabra hummus at the grocery store if I'm craving it for lunch. It does the job but definitely doesn't hold a candle to the real thing.

So one day I went searching for an authentic hummus recipe that I could make at home and be just as delicious (or close to it) as Aladdin's hummus. But there was one problem. Every time I would go looking for  tahini paste, I could never find it. I got the bright idea to look in the same section as olives and capers and VOILA it was there!!!


It is crucial to follow the directions to a "T" to get the desired outcome. It seems like a lot of work, but it's not. It just takes planning ahead. Of course you can adjust the salt, tahini and lemon but follow the process to a T.


Authentic Lebanese Hummus


1 bag of dried garbanzo beans
1 T baking soda
8 oz Tahini (sesame paste)
6-8 oz very cold lemon juice (pour over ice and shake to achieve this, and you can add very cold water too)
1 T paprika
Kosher Salt

Garnishes:
Parsley
Seedless Cucumbers
Red Bell Peppers
Roma Tomatoes
Greek Olives

Soaking:
Sort through your beans and discard any bad beans. Pour beans into a deep bowl and put twice as much water on them. And allow to soak overnight. Add more water if you noticed they start to become exposed.

Cooking:
Rinse soaked chickpeas off with ice cold water. Fill a large pot with water and add baking soda and bring  to a boil. Just like with pasta, you'll want twice as much water as volume of pasta to allow them to cook correctly. When the water comes to a rolling boil, reduce the heat to a simmer and allow to cook for 60-90 minutes. Make sure that the water is on a soft boil the entire cooking time. 

To tell if the bean is cooked, through it against the wall. It should stick momentarily. If it does not, it is not cooked. 

Skinning the Garbanzo Bean:
One the beans have cooked, removed the pot from the stove and put it under an ice cold tap. The cold water will shock the beans and help them to crack the shell. The skins will be a clear but milky color (like jellyfish). Give the beans a stir and they will float to the top. Remove them from the water. Gently massage the beans with your band to aide in removing the skins. Strain the beans and leave them in a colander overnight in the fridge. Cover them with a plate so that they don't freeze in the fridge. This helps to drain any excess water.

Preparing the Hummus:
Place the beans in a food processor and blend until you have a smooth paste. Add in tahini until the mixture become very smooth but a little firm.

Add in the cold lemon juice a little at a time. You must use ice cold lemon juice (like iI said you can shake it over ice or add ice cold water to it). This will help keep the hummus cold while it is being blended.

Add in salt to taste and paprika. Let it rest in the food processor for about 15 minutes. If you find that it has thickened, add in more lemon juice and blend.


I serve this garnished with paprika and parsley and love it on fresh pita, tomatoes and cucumbers.


Please do not use canned chickpeas. They are too soft and the consistency you get with them is not the same as with the dried beans. The recipe will make a very generous portion of hummus. 


Herb Dusted Chicken with Creamy Sun Dried Tomato Basil Sauce

Whoa...that's a mouth full. LOL

First, please don't let the word "creamy" in the title scare you away. It's not fat and calorie laden like you might expect a recipe with that name in to be.

With that said ....

I can't tell you for sure how long this jar of sun dried tomatoes has been sitting on my pantry shelf untouched, but what I can tell you is that it won't last much longer in my fridge now that I have made this chicken dish!!

I wanted something awesome. I had chicken breasts in the fridge that needed used and, lets face it, most often chicken dishes using breasts seem to fall short of the mark. If you would have asked me a year ago what cut of chicken I used it would have been a boneless skinless chicken bosom. But, when I joined weight watchers, I noticed that the majority of recipes called for boneless skinless thighs. I was hesitant but I tried them and now I know why. Breasts, unless cooked with a lot of fat, get dry really quick and tend to not be as delicious as the thigh. I had originally bought the breasts to make buffalo chicken dip for Super Bowl but opted for guacamole instead. So it sat there. And sat there. And it needed to be used. But it begged me to make it into something delicious and memorable.

This recipe does not fall short of that. In fact, my 4 year old daughter (who has been giving me a headache at dinner time for that last two months) actually said "Momma, this chicken is soooooooo delicious. Thank you for making me dinner." And she ate EVERY.SINGLE.BITE that was put on her plate!!! HOME RUN!

Herb Dusted Chicken with Creamy Sun Dried Tomato Basil Sauce


3 Boneless/Skinless chicken breasts
1/3 cup white onion, chopped
3 cloves garlic, minced
1/3 cup sun dried tomatoes, chopped
1/2 bunch of asparagus, chopped in 1 inch pieces
One - Two handfuls of fresh basil, confetti chopped 
3 T. flour
1 1/2 C. chicken stock
1/3 C. White Wine (I used Sauvignon Blanc, but any dry white wine will do)
1/2 C. whole milk 
2 T. Olive Oil
2 T. Butter
Salt and Pepper
"Perfect Pinch" garlic and herb seasoning

**A few things before we start. For the Olive oil, I used basil flavored oil that I have in ice cube trays in the freezer. I used whole milk but if you want something super creamy, use a heavy cream in its place. Mushrooms would be a nice addition but my boyfriend doesn't care for them. I wasn't sure how to measure the basil. I have a plant in my kitchen and used about 8-10 good sized leaves off of it**

1) Heat your skillet on medium high heat and put in the olive oil. In the mean time, slice your breasts in half (like you are butterflying but go all the way through). 
2) Season both sides of the chicken with salt/pepper and the garlic and herb seasoning. There really isn't a way to 'over do' the seasoning here. Get a nice crust on it.
3) Cook the chicken in the skillet until almost done, about 4 minutes on each side.
4) When chicken is almost done (about 3 minutes from being done), remove it from the pan and put on a plate and cover it.
5) Using the same skillet, reduce heat to medium and add in butter, onion and garlic. Saute for about 3-4 minutes. Add in the sun dried tomatoes and cook for another 3-4 minutes stirring regularly. Add in the asparagus and cook for 2 minutes.
5) Add wine and chicken stock to the skillet and let cook for 3-4 minutes. Take a 1/4 cup of the liquid out of the skillet and put it into a small glass bowl. Add the flour into this reserved sauce and stir until the flour forms a paste. Pour that paste back into the skillet and whisk vigorously, until sauce begins to thicken. (if it doesn't thicken to your liking, add a little flour at a time until desired thickness)
6) Add the basil and the chicken back into the pan and let simmer for 3-4 minutes. This will cook the chicken the rest of the way and allow it to soak up the good flavor of the sauce.

We served this over campanelle pasta but you can serve with roasted vegetables, potatoes or rice. Or even by itself with a fresh salad!

Enjoy!!